Metal 3D Printing - Large Format 3D Printer - 3DPlatform

Large build volume
3D Platform is committed to making your biggest ideas a reality. We design products that push the limits of innovation, and that’s why we are a leader in the manufacturing of large format, industrial-strength 3D printers. A widening variety of industries in manufacturing, entertainment, and academia have continued to take full advantage of these large format printers to create prototypes, mass-produce products, and build the future.
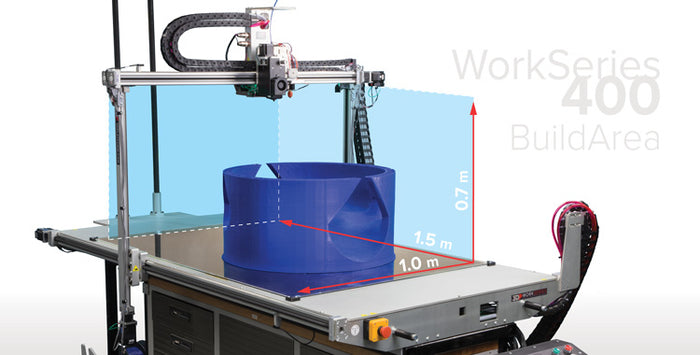
What is large? Our large build area is up to 1 meter x 1.5 meter x 0.7 meter. This offers over 200-percent more creative space than a typical desktop 3D printer, and means our customers don’t have to scale down or print multiple parts that require assembly. In addition, a large build area can incorporate rapid design iterations to vastly reduce market entry time.
Traditional desktop 3D printers are fine for prototyping parts, but can be costly in terms of volume production and time-to-market. In contrast, industrial manufacturers can customize our large format 3D printers, providing the ability to produce near-net shape parts. The result is decreased costs and reduced time-to-market.
Large format 3D printing made easy
Don’t let the words industrial strength or large format scare you! Printing with 3DP can be as easy as easy as 1 - 2 - 3D! Learn the different steps on how to successfully create a 3D print by watching our video 1-2-3D Printing.
Create your 3D model. Start with a 3D model that was either created in 3D modeling software or download from the internet. Next, save the model as an OBJ or an STL file. The 3D printer processing software best understands these file types.
Process the model in 3D printing software. Import the file and set a few standard model modifiers such as the number of top and bottom layers, perimeters, and infill. Next, increase the strength in the infill box by setting the interior fill percentage to 20 percent. If supports are needed, they can be added by clicking the “generate support material” button. Click “Ok” to accept the process settings and observe the model with its new layer slices. Finally, save the file in g-code format, which gives the printer step-by-step instructions.
Send file to printer. Heat the bed and remember to home the axes prior to each print. Next, select the g-code file. Once the target temperature for the extruder is reached, then the print will begin. Watch the first few layers to make sure the print adheres to the build area and that the filament is flowing smoothly.


